Showing posts with label bag. Show all posts

Wednesday, 18 September 2024

Red Woolen Belt Poaches

After selling the Blue Woolen Belt Poach, I found another picture for embroidery, so I got down to making two more woolen belt poaches.

I drew the image with a piece of chalk and embroidered in a frame.
This is how I make the cords - I tie two cords together, make a knot at each end and twist them with the help of a drill.
Lion and gryffin are waiting for their new owners.

Wednesday, 4 September 2024

Violet Pompadour Bag For Coins

 Too many cash left from different coutries. This was my inspiration for this type of bag that I've had in my pins for a long time.

Two big and two small circles. One of the big circles has a hole on the outside, right above the small circle's edge. Sewing around the edge, turning to the right side and adding one more line of stitches to flatten the hem.
Making the bottom and eight compartments, one for each country's cash.
Adding a tunnel for the fastening cord.
The cord must have stoppers at the end and mustn't be too long so that the pouch doesn't open too much for the content to drop out.
Lovely type of bag!

Wednesday, 26 June 2024

Fishing Rod Bags

I'm a minimalist and a fan of having my stuff light, compact and as small as possible. I carry my fishing rods in a backpack and needed something to protect them.

The lower part is as small as possible and the rest has to be as big enough for the winch. My favourite velcro fastening with two perpendicular velcro straps, sewn on so that the upper part of the bag is slanted (-> as small as possible) when closed.
The material used is a lightweight cordura and the seams are finished with a bias tape.

Wednesday, 25 October 2023

Blue Woolen Belt Poach

 I missed embroidery in my life so I made something for sale to medieval bazaar. I picked a woolen pouch with some design from real medieval textiles.

Here are just some pictures of how I made the strings for hanging. I tied two pieces of wool of different colors that would match the design. I used a drill to twist it and when the twist was tight, I folded it in half. It twisted together nicely.
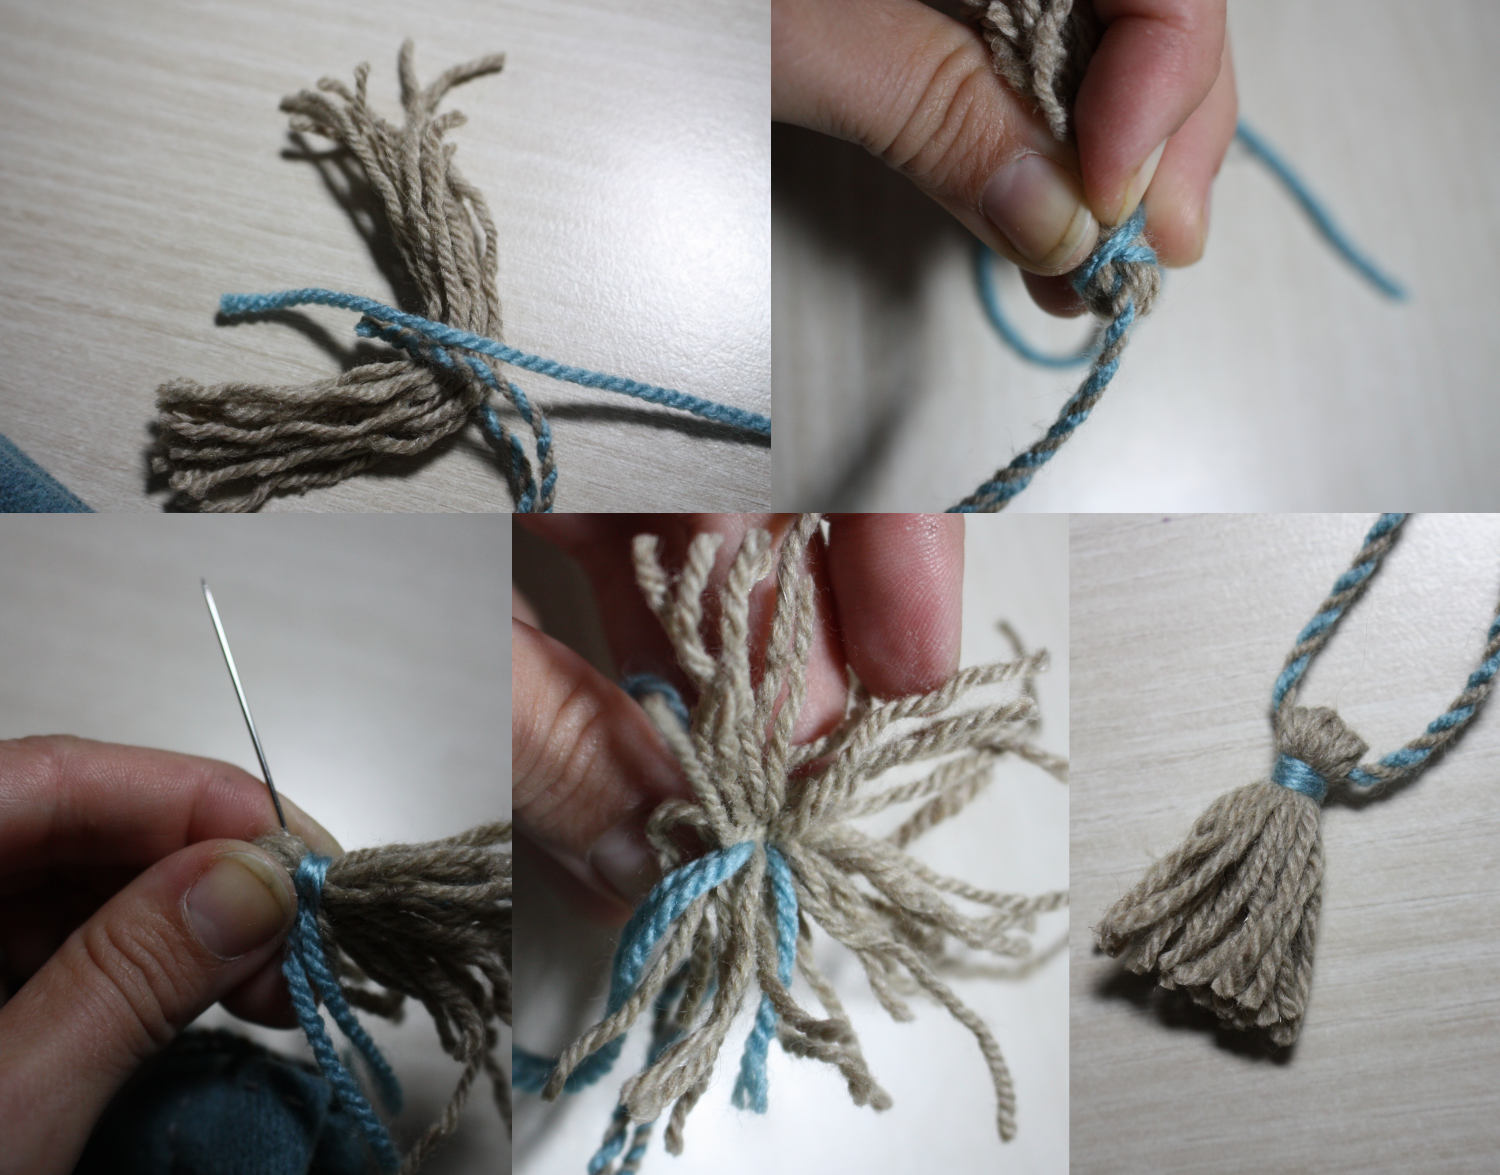
Medieval pouches were often decorated with tassels, so I added some to the corners and to the fastening cords.

Ready to ship!

Monday, 2 October 2023

Round Hanging Bread Pouch

 I wanted to try this type of bag, and I needed something to dry my bread leftovers for animals in.

I made some basic patter for seven segments with darts and a circle with circumference of the lower edge.
I sewed the side panel on a material that rags are made of.
I made the tucks, sewed the side seam and secured the edges in place with a line of stitches, as the fabric is very thick.
Quilting at the bottom piece.
Lining has the same shape.
I attached the lining at the upper edge and covered with a band that I prepared with iron.
I left some space before and after the end and stopped sewing to get the ends together.
I finished the band with a line of stitches in the seam at right side so that it's hidden.
Cute rounded pouch.
Looks funny :-D

Wednesday, 30 August 2023

Battery Pouches

It's been several years since I've known I need to have my batteries sorted, like visibly sorted. I've had pouches, but without writing and I never knew which one contained what.

I cut out rectangles and serged the edges. I made some tests and finally I used two layers of stiff cotton canvas under the embroidery. I made a sample of each writing and measured its length to know where to place it.
I sewed the edges, one of them not up to the very top, leaving a gap for cord fastening. I sewed the tunnel and that's it.
I was annoyed how it keeps opening, so I made a knot which slides on the cord and keeps the pouch closed.

Friday, 14 July 2023

Travel Zipper Cases

Based on facebook inspiration for a pencil case, I made a case for cutlery. Me and my husband love camping and this was missing in our gear.
The size fit almost exactly to A5. I made a patter from a leaflet, ironed cotton stiffener to the wrong size and cut out. I sewed on an endless zipper - right sides together. Zipper was below the fabric when I was sewing.
Then I went to the right side and made a line of stitches near the edge.
I put on the slider. This took like half of the production time :-D
I hemmed the end with a matching fabric.
And made a tassel for easy opening.
After this project, I found myself having half of the zipper in my hand... So I made one more for toothbrushes to keep them in my car permanently. This time I cut out the patter from the cotton lining, ironed it on and then cut it all out.
First phase of hemming. Then I folded it back and sewed at the right side between the layers so that the stitches are not very visible.
So this is the twin travel case.

Wednesday, 25 July 2018

Leather Jerky Pouch

This was a project to make a pouch for dried meet for our trip.
First I moisturized the edges with a sponge and made a line with a teaspoon. I made holes at the lower sides.
Instead of hammering the stitches, I used a pair of pliers. This protects the thread from friction.
I sewed the edges with the two needle stitch and made an oval hole for the leather band.
I wiped the outside with oil.

I wrapped up the fastening several times over the pouch. Lovely <3 p="">
The back of the bag.


Saturday, 12 November 2016

Heart Case for Bellydance Fans

Present for my friend, great dancer and creator and director of a belly dance show Dreams Come True. I was returning her the led-light silk fans that we used for the show.
The logo of the trademark. I printed it on paper and sewed through it to transfer the font on the fabric. I tore out the paper.
I set a very short zig-zag stitch and I sewed each shape twice. There's a fusible web at the wrong side and I used an embroidery frame for the best results.
I quilted through two fabrics and batting. It's a nice heart pattern. It will be a hearty heart with a heart logo. Madness :-P
Two quilted hearts.
I made a strange looking pocket for the batteries. I didn't want to damage the quilting with straight lines so I just retraced some of the hearts.
The fastening. I quilted through one strip of fabric, cut it in the middle and swapped the halves.
I sewed two squares of fabric to each end. 
I folded the edges inward and sewed in the zipper.
The bottom is a single layer of twill because it must be wider than the top and it would look strange I think if it was sturdy and keeping this shape all the time...
The edges are sewed together, cut to two milimeters and covered with bias tape.
When I woke up in the morning, I found my cat sleeping inside this :-) I couldn't get her out...
Handle. Ironed like this with interfacing on the wrong size, folded in the middle, ironed again and sewed.
Finished.
She could use it as a handbag for dance lessons if she wants to. Or at least for three fans.