Showing posts with label poi. Show all posts

Sunday, 18 December 2011

Spiral Poi - Finished

I did some little changes compared to the previous production.
I don't make a hole at the top, because my pair tore off at the point when I was spinning hard. It weakened the thinniest place at the poi. Now I just fold the top over a metal rectangle and I sew the handles to it.
And I decided not to embroider the upper hem of the sack with always the same stitch, when my Janome 7700 knows a lot of wonderful stitches. I'll chose it to match the picture on the sack :)
The poi pattern's just amazing :-)

Saturday, 17 December 2011

Spiral Poi

Again, again, again. I always end up admiring my customers' designs. This one is really cool :-)
Making a pattern meant precise measuring. The spiral always ends up at the right side and it must begin exactly at the same height and width on the left side.

I cut out all of the pieces and drew the pattern on the base two pieces.

I sewed the spiral pieces on with a satin stitch, I attached them to the base with straight stitch. The straight stitch must be close enough to the edge so that it wouldn't be visible after sewing the poi together.

I serged the lower edge and  ten centimeters of the side seam allowance. I marked the lower fold line and started sewing the poi together at the side seam. I didn't sew under the fold line to leave a gap for the cord.

I had to pin each satin line. The lines must connect exactly at the width of the seam allowance to make an impression of a continuous piece.

I folded the slit in and sewed to keep it in place.

When I folded the lower hem, I had to alternate the thread colours for the stitches not to be visible. I always prefer to have sleeve shaped things wrong side out when sewing the lower hem:-)

Are you curious what they'll look like when turned over?
So am I :-D

Tuesday, 19 July 2011

Black&White Poi

Four pieces poi. In chess colours.
I sewed four black+white pairs, at two of them I left out a place for the lacing.
Then I put each two pairs together. I ironed the seam allowance to the right and the left edge as well. I wouldn't be able to iron it properly after sewing...
When I sewed the tunnel for the cord, I had to change the thread colour at every seam :)
I sewed the upper edges together and I turned the poi over with the help of a knitting needle.
The owner's nick is QMax, so I used the initials as a picture :-)

Wednesday, 20 October 2010

Voi

I've got an order for a pair of voi - veil poi.
You just attach your belly dance veil to the ball and that's it.
I sewed two and two eye-shaped pieces at one side together.
Then I sewed these two together inserting a loop and a cord.

I cut triangles out of the seam allowances and turned the balls inside out.

I filled them with sand and sewed the hole with the whip stitch.

I attached the swivel handles and here it is.
The veil should be just easily knotted to the loop at the bottom.

Thursday, 29 July 2010

Microphone Poi

I wanted to have LED poi. Or some kind of glow poi.
Father gave me these shining microphones that blink when on. I broke out the sound button at first:-)

I cut out two pieces - one for the body and the mesh for the bulb.
I made a cylinder from the rectangle and gathered the circle on one side of it.

I didn't make a usual grommet eyelet. I folded the cylinder several times and sewed in one single point. I hooked the loop around it so that the lower part was hidden inside.

The longer side of the rectangle is not fully sewn, there's a gap to insert the microphone. I put it in and fastened the body at several places with a rubber cord.

Let's go spinning :-)

And see how lovely the light circles are!

Wednesday, 28 July 2010

Yellow Rasta Poi

The last pair of poi doesn't differ so much from the others, so there are just a few pics.

At the stripes I tried to use as much of the leftovers of the previous poi as possible.
Made the poi the usual way.

My client wanted me to make the grommets more tough. I cut out washers from the leather and glued them on with a quality glue. The glue made the eyehole more stiff. It should endure very fast spinning now:)

The last rasta pair with its sack.

Tuesday, 13 July 2010

Kiwido - The Final Touch

My kiwido poi are completed now.
I sewed ten spangles to each quarter, each with just two stitches.
I'm sending them today and wishing them joyful and long life:-)

Monday, 12 July 2010

Kiwido - Orange Finished

I had my orange kiwidos almost done.
I zig-zagged the tails and cut the threads away.

I prepared loops from a rubber cord.

I inserted them into the butts, the knot must be behind the bottleneck.
I took a double thread and gathered the bottleneck.

I wound the thread several times around the tail and made a few stitches through the rubber. Then I cut a small piece of a satin ribbon and hid this thread.

I made a pocket for each poi. I don't say pair, cause these poi will be used as single.
I cut the pattern (double layer) and marked the upper side of fastening.
I sewed there a twill ribbon with its sides folded inside. This makes a tunnel for the cord.
I sewed the two parts together and serged.

The last to do was the upper hem - I pressed it down and machine-embroidered over it.

So this is it - six fishie kiwidos.

And the pockets. I let the tails out - the kiwidos don't wrinkle this way and what's more - they look like buds in the pockets:-)

I used to dislike kiwidos (as a hard-core firelover), but today I changed my point of view.
Sometimes I just envy my clients:-DDD

Friday, 9 July 2010

Kiwido - Orange

I altered the pattern so that the bottleneck would be wider. At the yellow poi I wasn't able to turn them over and I had to rip some seams.
I did it and as a result I got a pattern that fits itself well when cut in pairs.

I cut the glittering fabric and decorated the satin.

I cut the fish, completed them in four, then put two and two together and pinned at always the same side.

I sewed all the fish at one side. You can see that I marked the middle at the beak so that I could start the seam exactly at the right point.

I ironed the vlieselin, basted the loop and inserted to the upper parts. The pin at the fish's mouth is good for the exact position of the seam.

I cut the seam allowance at the curved places, knotted the loops and serged the tails as at the yellow kiwidos.

Thursday, 8 July 2010

Kiwido - Yellow Carry On

Three yellow kiwidos. Should be done eventually today.
I knotted a rubber cord into a loop, inserted to the tail of a kiwido filled with sand and foam.
I gathered the fabric in the bottleneck, sewed the loop to it safely and hid under a satin ribbon.

I gathered the tail loosely with a rubber thread so that the loop wouldn't be visible.

I also made fingerloops for all six poi.This time I used as simple method as possible.

I cut a synthetic band, thawed the ends, folded to create a fingerloop and sewed by machine. I used a wide and heavy zig zag stitch (satin stitch).

And why all the rubbers?
When attaching the ribbons, they even don't need a knot, they adhere very well.

(OMG, three more poi to make, if just the nasty satin wasn't so difficult to process...)

Wednesday, 7 July 2010

Kiwido - Yellow Beginning

My new poi project. The client wanted poi for belly dancing, but not with a veil but with ribbons.
The task I got from her was the stranger the better. So I let my imagination do the job.
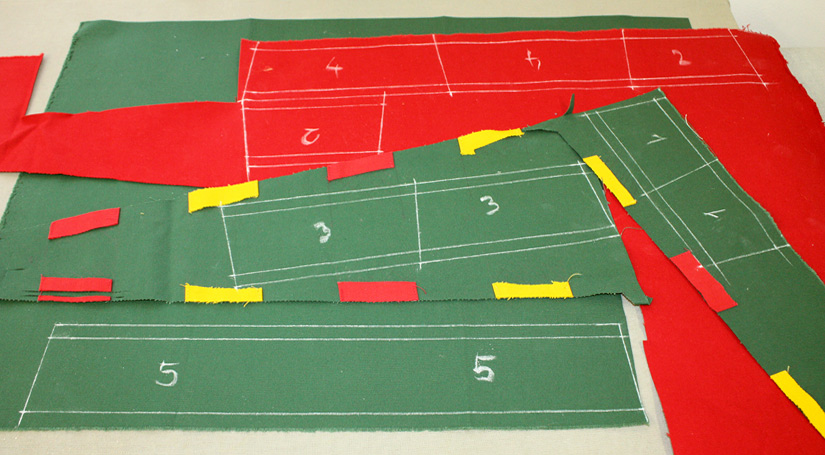
I made a pattern - from a pattern for four-piece ball, I prolonged it and added a tail.

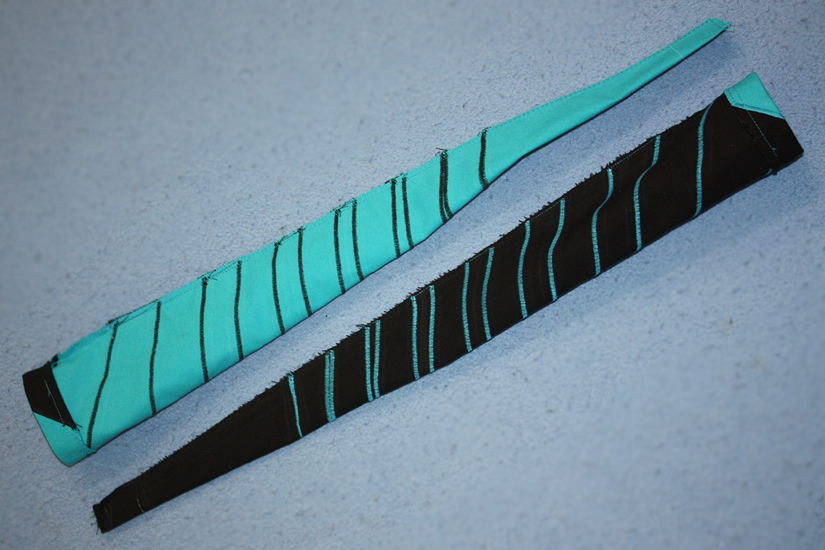
I cut various pieces from a glittering denim and pinned them on the fish.

I sewed them on with a narrow satin stitch. Not exactly at the edge. I want the edges to fray out a bit.
I attached the denim pieces with a straight stitch to the seam allowances of the kiwido pieces.

I'd made a prototype and I found out that the upper part stretches unpleasantly (it bears the whole weight). So I ironed a fusible web to toughten it.
You can see that I cut it in layers - right side to right side so that I could always get two mirrored pieces.

I sewed each pair of pieces and ironed the vlieselin to the upper parts.

I prepared a loop. I basted the loop and then I basted it to the fish at a marked place.

Those of you who are cleverer than me, must have seen that I had it wrong. I sewed it wrong, ripped out and here's the right version:-) The loop basted to the right side.

Turned over and...
...yep, that's better!

I sewed the fourth seam as well. I cut the seams at the curved parts (carefully not to damage the stitches), serged the tail and knotted the ends of the loop.

I zig-zagged the tail's edge. That didn't look very neatly, but as the edge at my concept was chaotic as well, I didn't mind. I wouldn't be able to serge the edge, satin is too troublesome material.

I'm gonna eat you little kiwido fishie!:-D
(Yes, I one of the RD weirdos)