Friday, 22 August 2014

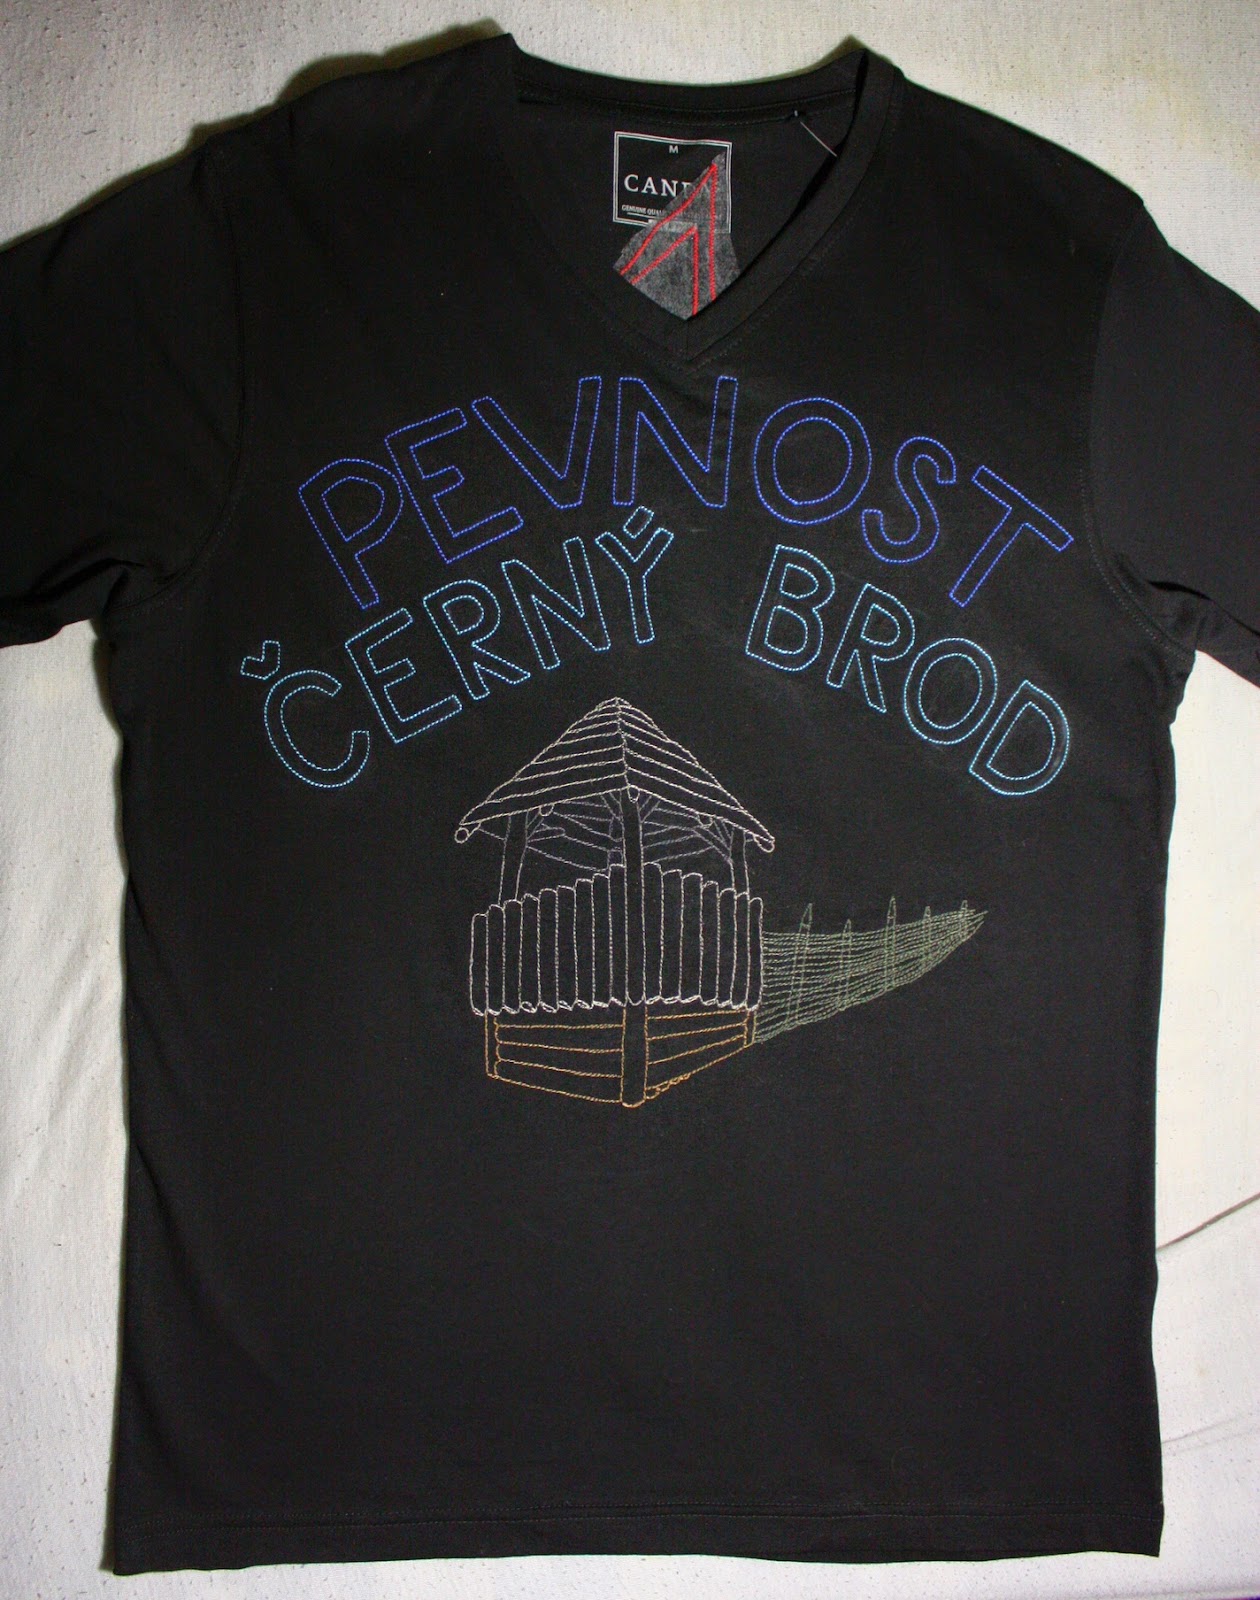
Black Brook T-Shirt - Finished

Nearly done :-)
 I finally finished the letters. I tore off the excess of interfacing.
 Embroidery always contracts the fabric - at the posts it's the worst. It needs to be stretched and steam-ironed.
 Tadaa, the T-shirt is done. Hope he'll like it.
 And one nothern god at the back :-D

Thursday, 21 August 2014

Black Brook T-Shirt - the Tower

My boyfriend has birthday soon and I decided to make something special for him. We and couple of friends are building a small medieval village and I have chosen the most significant building. I printed a picture and was wondering how to transfer the image to black T-shirt with the least effort :)
So I folded the paper around the tower edges, drew lines around it and went on until I had the whole outline. The main proportions were right this way, than I drew the inner lines freehand.
I sewed the roof in light brown. To show the shadow under it, I used dark brown  - I switched the color in the middle of line.
It is always good to have the same amount of stitch lines (more than one for a thin sewing thread). I went twice on every place.
 At the roof and sides I made one zigzag, when I sewed back I did the zigzag the other way round, so the vertical lines were doubled.
Finally I doubled the outline. It's a bit like drawing house in one move :-) Seriously, at the tower, the most annoying was cutting the threads, pulling them back and tie. I did it at least ten times the roof.
You can see that the embroidery hoop leaves a trace. You should always embroider in a hoop, preferably with interfacing under.
At the fence I stretched the fabric to the hoop really tight, the stitches would shrink the fabric even more at wertical direction, where T-shirts stretch the most.
When I made wattle fence, I drew a bit of rastr. You don't have to draw every line you embroider, but it's good to have something to keep the right direction.
At the back, a name of his favourite god is to be written in Futhark runes. Who can say which one it is? :-)
I was quite afraid doing applique on knit. I ironed the fusible interfacing on the red knit and cut out the letters. I also ironed it on the wrong side of the T-shirt, but as small pieces as possible. I marked their position by pin - I put it to the tips and drew a mark from the wrong side.
When I started sewing, I wished I'd used a double sided fusible interfacing, it helps a lot. I was afraid to use too dense zigzag stitch on knit, so I ended up with this.
At this project, the only thing I didn't draw freehand was the tower outline. Formerly I would have printed the letters, cut and outline. Not here. Even the loki went that way. But it's important to mark the height of the letters first. The neat width was kept because I sewed at a foot-width.
The letters had easy shapes so I could use a stitch when the machine makes one stitch forward, one backward and two forward. It looks the best when you can use feeding and don't have too many curves.
Not working anymore today, I've been embroidering for about six hours in a row and I'm dead! But only one writing remains, ironing and it will be done.

Friday, 9 May 2014

Fast Fire Dress

This dress in fire colours was my plan for summer. I cut a rectangle from cotton knit, folded in half and had the (double) top piece. Then I cut a skirt with uneven lower edge, gathered it to the top piece and that's it!
There is an elastic at the upper edge. I also added loops for bra straps. This way the top never falls off (it hangs on the bra).

Wednesday, 22 January 2014

Belly Dance in Blue&Brown - Bra Flowers

I drew a pattern on the right cup. Then I transferred it to the left one - I chose several points. At each point, I measured its distance from two other points (the center of the bra and the upper edge).
Boring work but efficient.
I spent a long time deciding about what the steams will be from. I didn't want spangles (which are the most comfortable to sew for me)...
I used something most jewelery crafters would probably tear my head off. I bought caps for covering pearls. I just liked that their gold shines like metal, unlike all of the plastic beads painted with some kind of goldish color...
I love gems, I just didn't get the color right. I should rip them off and start again with something blue or green or I don't know. I've chosen fabric colors that are quite difficult to match decorations to, it just drives me mad...

Monday, 20 January 2014

Wire Loops Necklace

I like this technique which shamely I don't know the name of in English, just in my language :-) It's used to make rosaries, maybe wire wrapping beads or something like this.
For the beginning, this is how I make the basic loop.
I make a loop, then a sharp break at the end and then I repair the loop to be symmetrical. This way I prepared stones with loops at both ends.
 Another component is a plain wire one.
 I make a small loop with the end of the pliers, then I add bigger loops made at the middle of the pliers. No templates, no need for them at all, just use the same parts of pliers every time.
Alternating the components, I added a red ball to the middle. I love it, but it's not very practical, this component is an eye candy and if it shifts from the middle of my neck, it doesn't look so good.

Saturday, 11 January 2014

Nephew Portrait

I decided to share something new to this blog. I like charcoal drawing :-)
This is my little nephew after having a bath.
At the drawing lessons at the university, we used to have vertical stands. It's a lot more comfortable to draw like this! That's why I picked this table :-)
Unfortunately, I realized I could take a picture after I drew the whole face...
I use a soft plastic rubber. It's useless for normal pencils but it takes the charcoal very well (when it's not a huge layer) and doesn't damage the paper.
But here you can see the progress - how the bathrobe fur looks like before and after blurring.
The finished portrait. I know he has got manga-like eyes :-D
But I didn't have enough strength to wipe them out and start over.

Thursday, 9 January 2014

Squash Racket - Finished

Today I was making the other half of the squash racket case.
I prepared a synthetic ribbon to cover the edge. I ironed it in half. At the side that should go to the upper half of the rocket, I didn't iron it straight but bend it instead.
It's a strange feeling to sew with right sides of the fabric out...
The ironing trick made my life a lot easier, especially at the curved sections :-)
 This is it. Maybe I'll add a bootstrap once.
I'm looking forward like a child to play with my new racket for the first time!

Squash Racket Case - First Half

I like making things with writings that are close to me :-)
My first job's company logo came to this squash racket case.
As at all panels made from several pieces, I made them a bit bigger. I cut out the final shape after sewing them together - this way the little inaccuracies that always happen (and accumulate with every seam) don't matter.
I sewed a band with a zipper at one side. By the way, the material is just brilliant. At one side it's sturdy synthetic canvas, at the other one it's covered with rubber.
It can't be ironed - the seams between black and orange must be flattened by two lines of stitches.
I started sewing from the corner because there I wanted the seams to match exactly.
I joined the other sides of the zipper and band just before I ended up sewing the edges.
 So far for one half. The case has some extra space to be comfortable and even the ball fits in! :-)

Wednesday, 27 November 2013

Belly Dance in Blue&Brown - Bra Covered

Just a little update on the bra - covering the bra with the fabrics is successfully finished. Hooray!
 The wrapping effect was quite easy to do - I sewed the edges, leaving a lot of fabric in the middle and attached it with tiny stitches, gently gathering it every time.

Thursday, 24 October 2013

Belly Dance in Blue&Brown - Covering the Cups

I feel like making myself a new bellydance costume. I believe I've learnt my lesson from the last attempt and I will only use stretch fabrics for covering the bra :-]
 The pattern. I put the lovely blue fabric on the cup and pinned it on, eliminating every wrinkle by stretching it, mainly diagonally. Then I cut it out leaving a 1.5cm seam allowance. I cut the other half symmetrically. The result should resemble a rectangle more than circle...
 I pinned it on again. Those who are not lazy can baste the right side at the edges - it simplifies the work a lot.
 I folded the seam allowance in a half and carefully attached it to the bra. It's ok to pull a bit to keep it smooth.
 Just tiny little stitches. If you baste it, you can get rid of the pins.
Around the cups, I sewed tiny back stitches.
 You can see the brown fabric too - it's tie-dyed and has some blue spots :)
The center is probably the hardest part. Not much space to manipulate...