Tuesday, 2 November 2010

Small Kilt - Done

I laid the pieces according to the markings from the fitting.
I put the fastening on them and marked the positions.

I pricked the stitch holes and sewed the leather strips on with a backstitch.

I sewed through all the layers so that the fastening would be stronger.

I sewed on the buckles.

I punched the holes and cut out the tips.

Finished small kilt.
Well, not a real kilt, of course:-) But enough for the LARP, I hope..

Wednesday, 20 October 2010

Voi

I've got an order for a pair of voi - veil poi.
You just attach your belly dance veil to the ball and that's it.
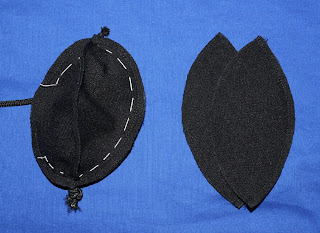
I sewed two and two eye-shaped pieces at one side together.
Then I sewed these two together inserting a loop and a cord.

I cut triangles out of the seam allowances and turned the balls inside out.

I filled them with sand and sewed the hole with the whip stitch.

I attached the swivel handles and here it is.
The veil should be just easily knotted to the loop at the bottom.

Sunday, 3 October 2010

Small Kilt - After the Fitting

At the fitting, I marked the overlap of both pieces.

I double folded and sewed the edges. I hemmed the lower edge by hand so that no stitches are visible. I sewed the pleats.
I cut the unnecessary material at the pleats (otherwise it would be thick as hell), traced the shape on the lining and added seam allowances.

I sewed the lining to the piece at the waist edge.
You may notice that I made two little pleats at the butt - to provide free motion in the skirt.

I turned the lining right side out and folded the upper corners inside. You can see that I folded in one whole pleat - the lining will make it head to the center of the skirt.

I folded inside and pinned the rest of the lining. I used my arranging mannequin to get the right shape:-D
I basted the lining and then sewed it onto the piece by hand.

Thursday, 16 September 2010

Three Fingered Gloves

When I saw this page (by Marc Carlson) I knew it would be the right for me. My usual problems with patterns occured. It took me about one day just to get the right shape and size. I produced some (many) models and finally I got it.

I had wanted to make it of the leather but in the end after some meditation I bought a FUR-LIKE PILE FABRIC (pshaw), for which I'm not proud of myself at all. However will heat more than a raw leather. Anyway, I saw fur inside the gloves on the pics and had no natural fur:)
I made the pattern for the body of the glove and transferred it to the fabric with a marker (not very good as well but I hate that the chalk disappeares regularly from my patterns:) ). Sewn. The hole's not developed yet.

Then I tried to make a thumb. Both patterns can be seen below but don't mind the hole. It was drawn on the glove on my hand. You can notice that in my pattern there's a v-shaped space between the fingers, although in the original one there's just a vertical straight space. I tried it ot first but the fingers seemed to cross slightly when I put the glove on.

So this all was done on the machine and now I had to use my hand's best:) It was a "hidden backstitch" as I call this marvellous stitch which, in my opinion, can resolve almost any problem as far as sewing:)

I don't like artificial furs at all. But finally I had to admit it would look better with it visible.. I pinned the bottom and folded the upper part to sew it with the magic stitch again.

Call me Donatello! (For those who don't watch Ninja Turtles these creatures had three fingers.)

I didn't attach the loop that was usually on the original pictures, from this fabric you can't cut a strip as easilly as from the leather.

I just love my gloves. As always, they're quite tight (improbable for a gothic garment supply). But it fits well.

Friday, 13 August 2010

Red-Black Costume Finished

The surcoat, the hood and black trousers made the usual way.

Thursday, 12 August 2010

Red-Black Costume - Surcoat

The waistcoat part of the costume:-)
I took the pattern from the st. Wenceslas' tunic.

I sewed the shouler and side seam leaving slits at the lower edge.
I serged the shoulder seams and the side ones without the slit.

I traced the armhole shapes on the red canvas, traced the position of the shoulder and side seam and added the seam allowances.

I sewed the hemming pieces together and ironed half a cm of the outer edges to the wrong side.

I sewed on the hemming pieces at the armholes. I laid them right side to the wrong side of the waistcoat and sewed on at half a cm.
I turned them to the right side and ironed leaving a little red strip at the wrong side so that the seam couldn't be visible at the right side.
A little tailor's trick:)
Then I sewed the hems on at the outer edge.

I aligned the lower hem lining with the slit on the tunic so that both slits begin at the same point. Right side of the lining to the wrong side of the tunic, I sewed on one half of the lining from one slit to the other.

I cut the seam allowances to the last stitch of the line and turned the lining over to sew the other half in the same way as the first one.

I sewed on the hem in the inner edge. I had to cut the corners to fold the seam allowance properly.

I folded in the cut seam allowances and sewed on in hand.

Red-Black Costume - Hood

I wanted to make something easy, that I could sell at larp battles. And from canvas, not velvet:-D
Well, I bought some black and red cotton canvas and here we go.
I cut out the pattern. Once from each colour.
I added gores to the shoulder slits and sewed the center-front and center-back seams.

I could press the seam allowances but I had to trim them at the curves.

I sewed the two hoods together at the lower edge. I sewed right side to right side.
I also sewed the seam allowances at the tip of the liripipe together. For easy changing of the colour of the hood:-)

I folded a cm at the face edges in and ironed.

I basted the edges and sewed together at two milimeters from the edge. I ironed the lower hem and sewed this way as well.

That's all:-)

Thursday, 29 July 2010

Microphone Poi

I wanted to have LED poi. Or some kind of glow poi.
Father gave me these shining microphones that blink when on. I broke out the sound button at first:-)

I cut out two pieces - one for the body and the mesh for the bulb.
I made a cylinder from the rectangle and gathered the circle on one side of it.

I didn't make a usual grommet eyelet. I folded the cylinder several times and sewed in one single point. I hooked the loop around it so that the lower part was hidden inside.

The longer side of the rectangle is not fully sewn, there's a gap to insert the microphone. I put it in and fastened the body at several places with a rubber cord.

Let's go spinning :-)

And see how lovely the light circles are!

Wednesday, 28 July 2010

Cranach Dress - Sleeve Tubes

I measured the girth at several places of sister's arm and cut out these horizontal parts of the sleeve.

The vertical stripes are made as tubes.
Here you can see how I found out how to sew the unpleasant velvet with satisfying results.
You put it on the table right sides together. You move the finger on the surface like a sewing machine foot. You just watch the way it reacts.

Here the upper layer moved three milimeters to the left. When sewing you just shift it three milimeters to the right:-) This way you may not end up mad from this ever sliding fabric..

I got quite a lot of tubes. I sorted them out according to the desired lenghts of each part of the sleeve.

I turned the tubes over and pressed flat.

I cut them with my patchwork rotary cutter.

How lovely! <3

I joined each vertical part of the sleeve with the overlock stitch.

That's the only way to handle all this tubes reasonably:-) And to be sure not to have a tube upside down (the velvet changes its colour when not laid the same direction).